Best Smart Blinds Compatible with Alexa & Google Home in UAE
The demand for smart home automation in the UAE is rising for energy efficiency, security, and a luxurious lifestyle. Smart blinds add comfort, convenience, and a stylish look to your…

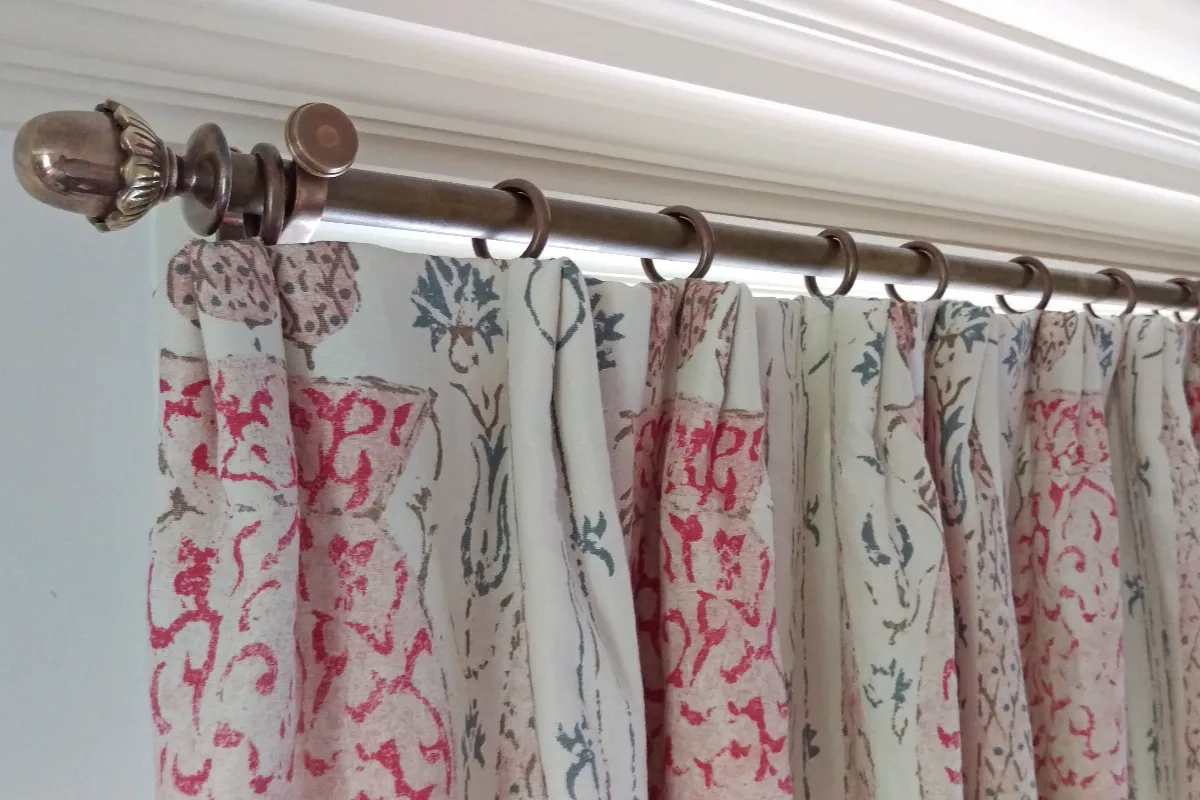
Pinch pleat is a curtain heading style in which fabric folds are pinched at the heading, creating a tailored look. Because of their uniform, neat, and structured folds, they are very popular across decor styles, including modern, traditional, and contemporary. They hold their shape elegantly when you open or close the drapes. Unlike rod-pocket or grommet-style drapes, properly hung Curtain Rings look graceful and luxurious, offering a structured, elegant, and timeless appearance.
If you are curious to know how to hang pinch-pleat window covers, then keep reading this article. This will explain all the necessary steps, from preparing windows to the final adjustment for a high-end professional finish.

Gather all the required tools and materials for a smooth and hassle-free installation of pinch pleat drapes. Here is the list.

Before hanging luxury window curtains, it is necessary to get the right measurements for your drapes. To get the right curtain length and width, you need to measure the window accurately. Let’s dive into exploring more.
After measuring the window width (from one end to the other), add 12-15 inches to each side. This is the width for the rod or track you need to install the plated drapes. The extra width ensures full coverage when drapes are closed and proper stack back when they are open. To determine the curtain width, multiply the rod width by 1.5, 2, or 3 to get the desired fullness.
For the curtain length, choose the one that suits your decor. For sill-length pleated drapes, measure the window from the top rod to the lower end of the window. If you want an apron-length one, measure down 5-6 inches from the window. For the drapes that barely touch the ground, measure their length by 3-6 cm apart the floor. So that after stitching, the final finish will touch the floor. Extend the measurement by 5-6 inches for puddling-style curtains.
Rod placement is crucial to get the desired finish before hanging drapes. It decides the overall look of your room. Higher rod placement will make your window look bigger, create a look of a taller ceiling, and give your room a complete look. If it is wide too, then your curtains will make your room look bigger, creating a sense of openness. Here are certain tips for rod placement if you opt for a professional finish.

Properly hung drapes look great and function accurately. So, before hanging pinch pleated drapes, install the rod carefully. Improper rod installation may lead to poor functionality, uneven look and incomplete aesthetics. Here are some important considerations in this respect.

As you know, the pinch pleat drapes can be installed on rods or tracks with pin hooks. To insert hooks into the pinch pleats, lay your curtains flat on a level floor. As you know, the pleats are already sewn into the heading, so make sure the back of the pleats faces you for precise pin insertion into the seam. Insert the sharp edge of the hook into the seam on the back of the curtain.
To determine how many hooks are required, count the pleats on your curtain. You will require one hook for one pleat and three extra pin hooks for two corners and one in the centre for better support.
After inserting a few pins, hang the curtain to check whether you set the desired length. If there is an error, you can easily fix it by adjusting the pins. If the length is correct, pull the curtain back and insert each pin into each pleat. Take one panel and start inserting from one pin into the outside edge of the curtain and the second pin into the inside edge.
Leave the inside edges of the second panel free to create room for the overlapping of both panels. If you insert it like this, the hooks will be spaced evenly.

Once you are happy with the hook insertion into the pleats, the next step is to attach these hooks to the rings or carriers. If your rod is a simple ring-style, attach these pleated curtains to the holes at the bottom of the rings. A small hole or eyelet is provided at the bottom of the ring that slides on the rod. So, hold the hook you have inserted into the pleats and insert it into the eyelet of the ring. Repeat the process for all pin-hooks. The hooked side easily passes through the hole.
To mount the hooks on the traverse rod (with a track and carriers that slide along it), insert the hooks into the carriers one by one. Do not forget to pin the hook at the end point of the rod or track to ensure smooth and secure gliding of the curtain. At the end, check that the pleats fall neatly.

Once you have completed the last hook or carrier, slide these rings onto the rod carefully. Loosen the screws of the brackets and open one side of the rod. Insert one panel ring onto the rod, followed by the second rod. Then adjust the folds for an even, consistent, tailored & graceful look. After hanging the curtain on the rod, tighten the bracket screws. Adjust the curtain panels, ensuring they meet in the centre.

Once you hang the curtains on the rod or track, see what it looks like; it must be sophisticated and elegant. The first thing is to evaluate its length by straightening the bottom hem. If there is any difference in panel length, hem them at the desired height. Then check whether all pleats are even and whether the fabric is evenly adjusted on both sides of the pleats. Use the manual method of fixing uneven pleats. Using your fingers, adjust the pleats from top to bottom. Make sure all the folds are evenly spaced and at the same depth. The best is to tie the folds at the top, middle, and bottom, and let them set for 24 hours.
Use tiebacks or holdbacks for pleasing aesthetics. For a crisp, elegant look, steam the curtain to help it hang straight and gracefully. By following these guidelines, your drapes will look flawless and perform at their best.

Here are a few tips from expert interior designers for a complete finish. Follow them if you want the same results.
While hanging pleated curtains, some mistakes can ruin the overall aesthetics and poor functionality. Have a look at these blunders to avoid.
We have covered in detail the method for hanging pinch pleat curtains to rods or tracks using rings or pin-hooks. They look classic thanks to their even folds, giving every interior a sophisticated look. To achieve a professional look, regardless of your window size or drapery fabric, attach the pinch pleats to the hooks and the hooks to the rod. Each panel should have an equal number of pleats, spaced at equal intervals. For high-end aesthetics, try pleated drapes.